Monday, November 8, 2010
Coil Project--Homework Assignment
Friday, October 22, 2010
Homework Assignment...Cup and Saucer Midpoint Assessment
Please write down your answers to these questions and have them ready by MONDAY NOVEMBER 1st
If there is anything else you need to do to finish your project, please describe what that is:
What do you think is the most successful aspect of your project? How did you achieve this?
What is one area that you think you could still improve on your project?
What is one technique that you used in this project that you will use on future projects?
Tuesday, October 12, 2010
Cup and Saucer Sketchbook Assignment Due Friday, October 15th
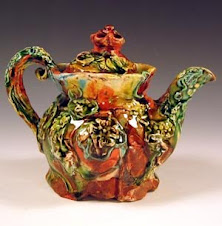
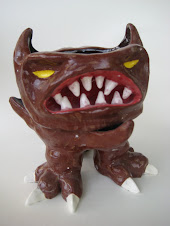
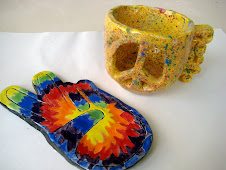
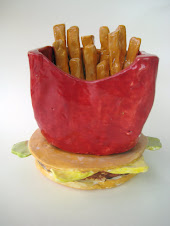
Your next project in class will be to create a cup and saucer based on a word of your choosing. This word will help you determine the colors, shapes and overall mood of your project. See the examples to the right of past students' projects!
In your sketchbook, choose three words to illustrate. Choose from the list below, or choose your own! Draw out ideas for how the word could be turned into a sculpture that you might be able to use for your pinch pot project.
Remember that there is a cup and a saucer--how could you relate the two together? Think about whether you want your cup and saucer to be functional or sculptural. Draw your sketches in your sketchbook IN COLOR!
acidic wiggly aggressive joyous silent tiny stormy tired fluffy curly loud lovely slimy unruly precious dazzling elegant cloudy delicious mysterious grumpy lucky puzzling enchanted ancient valuable heavenly graceful dreary alive crooked lacy rotten strange spiky poised overgrown sleepy friendly
Thursday, September 30, 2010
Stamp Assessment: Class Discussion
save this sheet: use this as a guide for our class discussion, then attach it to a grading rubric when passing stamps in
What part of your completed stamp project best shows your creativity and craftsmanship?
After seeing your stamp fired, and testing it in the clay, what aspects of this project could you have improved upon?
What was the most important thing you learned from this project, that you think will help you as you continue to work with clay?
(*check here if you have made an extra credit stamp, and include both stamps when you pass them in.)
Monday, September 20, 2010
Friday, September 10, 2010
Creating a Clay Stamp
1. Complete your designs for both the initial stamp and symbol stamp. Check them off with Miss Mahoney. You will put your initials on one side of your stamp, and the picture or symbol on the other.
2. Recycle and wedge a piece of clay about the size of an apple.
3. Break off a piece of this clay and begin shaping your stamp handle. Remember that the handles can be circular, square, triangular—whatever you like, but they must not be thickerthan 1”! Leave the ends wider for the images to be put onto.
4. Flatten the ends of your stamp handle so they are smooth and ready for the designs to be drawn on.
5. Trace your designs onto small pieces of tracing paper with a pencil. Then put the tracing paper pencil side down onto the flattened end. The design should appear backwards at this point. Trace over the design with your pencil or a pin tool and check to make sure the graphite has transferred onto the clay.
6. Use a pin tool to cut off the clay around your design to make the letters or picture pop up off the block, or use a carving tool to scoop out the clay inside your letters or picture to make them indent into the block.
7. Smooth out the entire stamp: this is best done when most of the carving is complete, and the stamp is leather hard. Scrape out any excess crumbs of clay, use small amounts of water to smooth the handle and surfaces of your stamp.
8. When both sides have been carved, put your name and block on the handle of the stamp (legibly), check it with Miss Mahoney, and put the stamp on the Greenware shelf to be fired!
Wednesday, September 1, 2010
Miss Mahoney
Clay is an ancient medium that began as a means to create functional objects used in everyday life, and has evolved to become one of the most beautiful forms of artistic expression. In this class, you will have the opportunity to explore your creativity through the form and function of ceramics. I encourage you to take risks and develop your personal style throughout the semester.
In this class, we will study the beginning techniques of pinching, coiling and slab building. We will also practice beginning skills on the wheel. In addition to the class work, you will have weekly assignments reinforcing the techniques we are studying.
For this class you will need:
a shoebox to store clay and projects in
a notebook to record outside assignments and sketch project ideas
five plastic bags to wrap clay in--small trash bags and gallon-sized Ziploc bags work well
Grading
Your projects will be graded by the execution of the technique studied, the glaze or finish, and your written feedback on the grading sheet. Your overall grade will be a combination of your projects, outside assignments, and effort.
Cleanup
Keeping this room clean is a matter of safety. Each artist is responsible for their own workspace as well as a weekly studio job, which will help with the general maintenance of the studio space. Completion of your cleanup jobs will factor into your effort grade.
Expectations
*You will show up on time and remain in class until the bell rings. If you need to leave, tell me. Lining up at the door before the bell shows me that you have extra time to do more cleaning!
*You will work on projects throughout the class, and clean up well every day. Your effort grade is heavily based upon everyday work habits, so make them good. No non-enrolled students are allowed in the room during class time.
*No food or drink in the room. It is unhealthy to eat in this room due to the nature of the materials we use, and this also avoids messes in the workspace.
*No Ipods or cell phones during class. This is a school rule as well as my own rule—these devices are distracting and antisocial, making it difficult for me to teach and for you to learn.
*Respect the kilns! They are almost always running, and they get very hot. Please be careful when bringing work into the kiln room.
*Respect each other. Remember the Golden Rule? Your language and attitude create the atmosphere in our classroom, and make it a comfortable place to be. If you can speak in a respectful way and manage your time well while you are in this class, you will do well this semester.
Monday, May 10, 2010
Artist Study * Mini-Research Paper
For this paper, you will find a ceramic artist whose work you are particularly drawn to…look online, in books or magazines for inspiration. The artist can be contemporary, meaning they are alive and creating ceramic art today, or they can be from any point in history.
Print out or photocopy at least two images of your chosen artist’s work. These photos will be passed in with your paper.
The paper will be a summary of the artist’s bio as well as why you chose them and what specifically you admire about their work. This should be about 1 page: make sure you include all the information below!
-who the artist is
-important dates: birth, death (if applicable), when they were creating artwork
-where they are from, where they work(ed)
-what specific techniques do they use? types of clay/glazes, type of kiln/firing process
*hint: when you see a word you do not recognize, ex. “raku”, look it up in Google or Wikipedia and describe that in your paper!
-why you chose this artist: what drew you to their work? why do you admire this person, what about your knowledge of ceramics makes them particularly interesting?
-what connections can you make between this person’s work and your own ceramic work? are the two similar in style, concept, form or finish? or are they very different—and how did the similarities/differences influence your decision to choose this artist in particular?
Please use complete sentences, and type the paper….remember that the content is more important than the length of the paper!
*Due Friday, May 21st*
Monday, April 26, 2010
Luminary: a body that gives light, especially one of the celestial bodies (Merriam-Webster’s online dictionary)
Our ceramic luminaries will be box forms that enclose a candle, have a lid, and let out light through a series of pierced decorations.
Create a challenging geometric form with your slabs. Make a paper template before beginning. Control dry slabs to leather hard, bevel edges and slip and score well!
Use piercing in a thoughtful and meaningful manner: piercing should enhance and fit with the overall theme.
Use a color scheme with surface decoration that is well chosen and well applied.
Optional: tie the visual theme of your luminary to a dream (which could have occurred during sleep, or may be a wish or want while awake)
Homework due Friday, April 30th (or before for extra credit!)
Sketch out your idea for the luminary on the back of this sheet
Also--go to www.begceramics.blogspot.com to check out pictures of luminaries, and leave a comment for extra credit!
check minus=late, on time but not in color or rushed
check=on time, in color, thoughtfully drawn
check plus=early, more than one sketch, in color, description included
Wednesday, April 7, 2010
Visual Pathways
There are many ways to create interesting visual pathways on your project using surface design. The goal in coming up with a surface design is to create interest all around your three-dimensional piece. Leading lines are lines in a design that lead the viewer’s eye around the piece…try diagonals, or flowing, sweeping lines that carry the design from one side of the piece to the other.
Will you follow the symmetry of the form,
or will your design be asymmetrical?
How will you use surface design to give the
viewer clues about your culture
or personal interests?
Wednesday, March 24, 2010
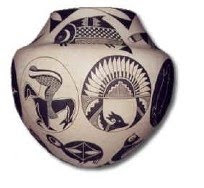
Coil Challenge The coil technique was developed as a means of creating larger, symmetrical forms without using a wheel. Often coils are added to a wheel-thrown form to add to its existing height. Coils can be used to create complex or simple shapes that may be difficult or impossible to create on a wheel.
Ancient cultures used coils to create everyday wares, such as cooking pots, garden pots, perfume or oil jars. Many cultures also created forms used specifically for celebrations or rituals, like a serving dish for a feast, a musical instrument, or a funerary urn. The surface decoration on the pottery tells a story of the culture it came from.
If your coil pot was found 100 years from now, how would it represent your culture? How will you use surface decoration to enhance the overall form of your pot, as well as incorporate modern patterns and imagery into your project?
Create a coiled form focusing on symmetry and balance: focus on craftsmanship and neatness as well
Decorate the surface using sgraffito or the coils themselves: create a surface that tells a story or shares something with the viewer
Focus on excellent studio habits: showing up on time, working throughout each class, doing studio jobs thoroughly
Design your coil pot below. Create a sketch of the form of your coil pot, then color in the surface showing how you will decorate the form.
Sketches due Monday 3/29
Monday, January 4, 2010
Artist Study * Mini-Research PapeR
For this paper, you will find a ceramic artist whose work you are particularly drawn to…look online, in books or magazines for inspiration. The artist can be contemporary, meaning they are alive and creating ceramic art today, or they can be from any point in history.
Print out or photocopy at least two images of your chosen artist’s work. These photos will be passed in with your paper.
The paper will be a summary of the artist’s bio as well as why you chose them and what specifically you admire about their work. This should be about 2 pages: make sure you include all the information below!
-who the artist is
-important dates: birth, death (if applicable), when they were creating artwork
-where they are from, where they work(ed)
-what specific techniques do they use? types of clay/glazes, type of kiln/firing process
*hint: when you see a word you do not recognize, ex. “raku”, look it up in Google or Wikipedia and describe that in your paper!
-why you chose this artist: what drew you to their work? why do you admire this person, what about your knowledge of ceramics makes them particularly interesting?
-what connections can you make between this person’s work and your own ceramic work? are the two similar in style, concept, form or finish? or are they very different—and how did the similarities/differences influence your decision to choose this artist in particular?
Please use complete sentences, and type the paper….remember that the content is more important than the length of the paper!
*Due Friday, January 15th* *Please include Sources!*


